Saturday, July 7, 2018

Cartoon Fundamentals: How to Draw a Cartoon Body


by 
Length:LongLanguages:
This post is part of a series called How to Draw Cartoons.
Cartoon Fundamentals: The Secrets in Drawing Animals
Cartoon Fundamentals: How to Create Movement and Action
The pleasure of creating a cartoon character is immeasurable. The act of building and developing a character is not just linked to the construction of the figure: each character has its own shape, personality and attributes. 
It's OK if you already know about the proportions of the head and about facial expressions. But that knowledge is useless if you don't know how to build their bodies! 
The artist must take into consideration these qualities in order to build a character that is plausible in the eye of the audience. To get some inspiration, have a look at the hundreds of character designs on Envato Elements. Or for a shortcut, try a character creation kit!
character designs on Envato Elements
Character designs on Envato Elements
In cartoon, there are several different styles of characters, such as "goofy" and "bully." Do you want to learn more about them? That is what I will teach you in this tutorial.
When creating characters, I recommend the use of rough sketches before hand. This will provide you with the perfect direction of style and nature of your character.
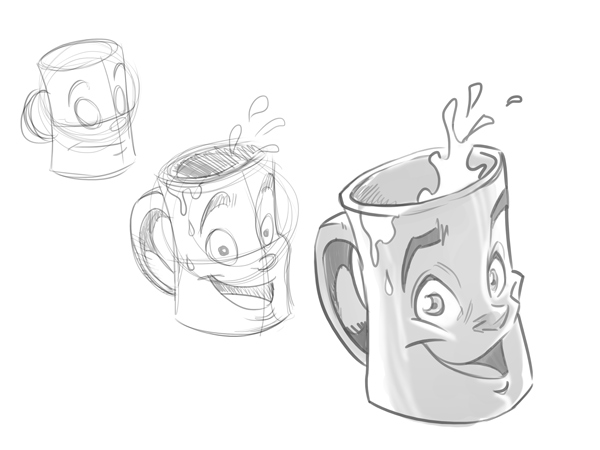
That being said, the steps that we follow today are quiet simple. First, draw the basic shape of the figure and then go adding features and other details of the body. This is a procedure that should be followed regardless of your character to be a human, an animal or even an object that you want to bring to life (eg, make a smiling cup).
cartoonbodies-01
Every drawing you will make depends on the sketch phase. During this stage, you will refine your draft until the end result pleases you completely.
Once you have defined your ideal proportions, the next step is to develop the expressions of body movement, hands and legs. Hands even can tell a complete story with only one position.
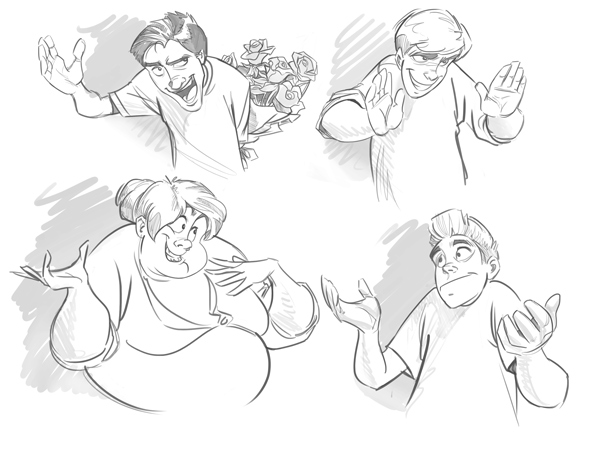
cartoonbodies-02
Hands are an extensive and complex a subject (even in cartoon) and deserves a tutorial dedicated solely to them.
Briefly, there is no mystery to the cartoon design process. 95% of artists build the characters and their moves through specific blocks, because it simply makes the process a lot easier!
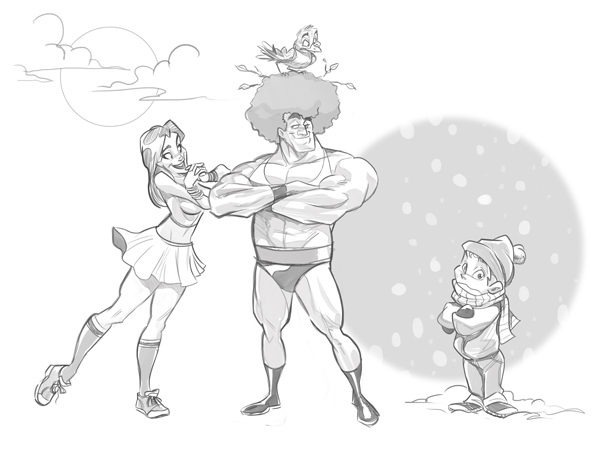
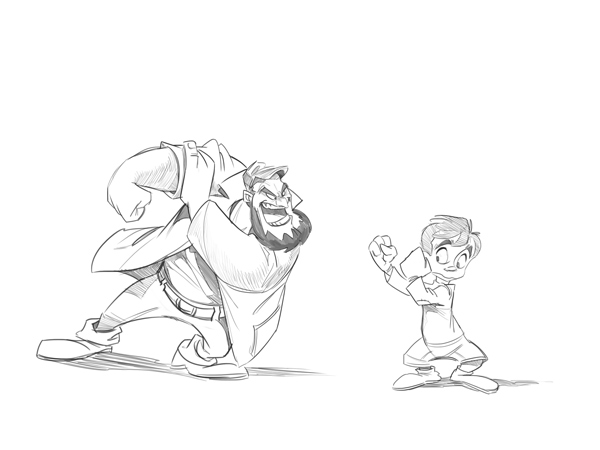
Proportion is the most important factor to consider in building a cartoon character. The artist should keep in mind the relative size of body parts, because it's based on them we'll define the structural features of our characters. For example, the bully guy has a combative nature, therefore has a small head but his chest is prominent! His arms and legs are strong and well defined, as well as his big jaw. In contrast, a demure character is based on the proportions of a baby with a large head in comparison to body. And all of it in rounded shapes! Other features, such as the forehead and large eyes are responsible for defining their fragile personality. And so on...
Animated studios have the famous practice of using oval shapes to measure the height of a character. For example: A child usually has a head larger than the rest of the body measurements. But the adult has different proportions, which varies according to gender and physique of each character.
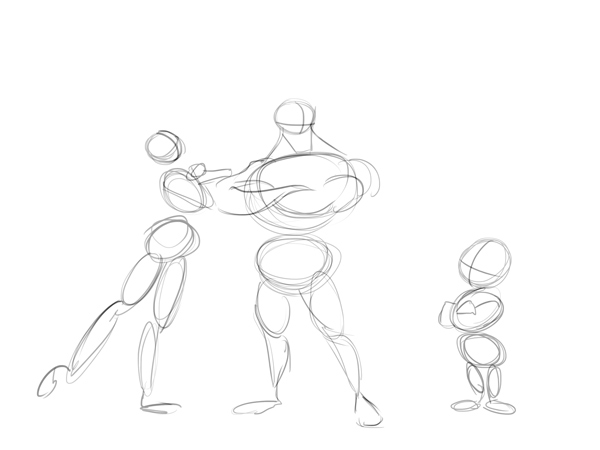
cartoonbodies-03
cartoonbodies-031
Psychedelic cartoon? Looks like it.
When designing (or animating) a character's entire body, it's recommended to keep several drawings of it on a separate piece of paper. Thus, it's possible to have a reference of his proportions to draw it in different poses and actions.
cartoonbodies-04
Turnaround example
cartoonbodies-041
It's important to draw your character in different positions, situations and clothing, until you can find the ideal body proportions for him.
cartoonbodies-05
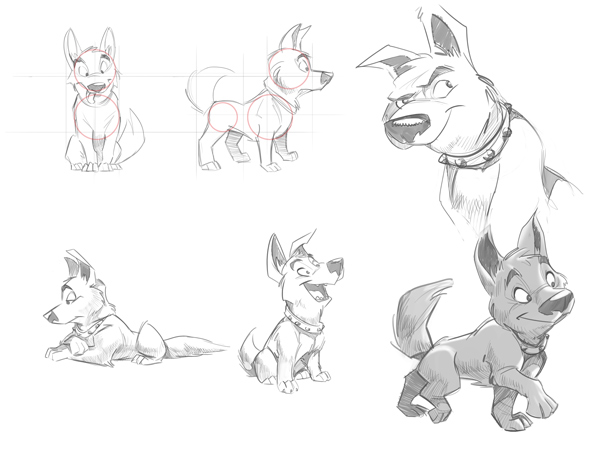
Samples of a puppy dog.
It's common practice among designers to use pear shapes - or similar objects - to build the body format, because of the association that generates inside everybody's head. Actually, this is a common technique among cartoon studios, since several different artists work on the same character and must maintain the correct proportions of each one.
cartoonbodies-06
cartoonbodies-071
The above examples demonstrate the effectiveness of this technique. You can draw several different characters using the same template! The reason for drawing based on templates is to create an immediate identification in the human brain. Especially in children - where everything should be simplified to be understood. Drawing the body in the format of a pear, helps maintain a dynamic look and adds an overall interest in our character!
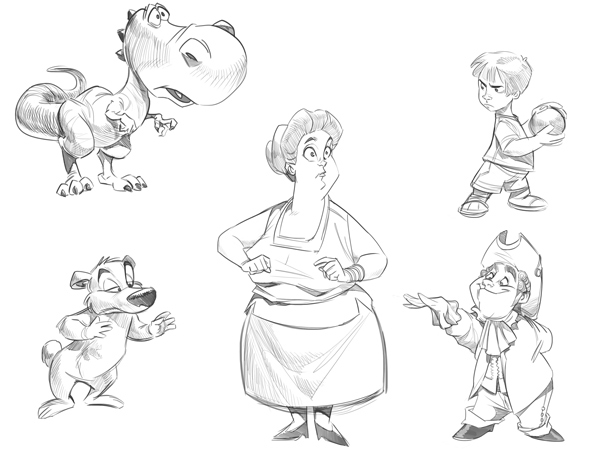
cartoonbodies-08
Now that we know how to define the forms, we need to define a simple skeleton structure. If you draw any kind of character in a cartoon style, you need to understand the main differences in muscles and bones among different cartoon categories, such as cats, birds and humans. This knowledge is necessary and it will guide us in relation to the character's joints, such as elbows and knees.
cartoonbodies-09
Notice the pattern: Rounded formats - pear body - skeleton joints.
When it comes to cartoon, it is important to keep in mind that we should be able to tell a story with each scene that we create. This does not happen often when it comes to photos or realistic drawings. Simply because human beings have a great facility to hide their real intentions.
In cartoon it's different. The gestural and physical characteristics of your characters must be clear even without any dialogue or scene orientation. For that reason, it's such a fascinating and adorable art style!
cartoonbodies-10
cartoonbodies-11
Learn how to tell a story with your sketches and you will become a successful cartoonist
To summarize:
  • Measure the proportions of your character with rounded shapes;
  • Wrap the body using the famous rule of pear;
  • Trace the lines that serve as guides of the main points of character's joints (skeleton);
  • Complete your character with the final details around the structure you've built.
Does the "rule of pear" work for all cartoon characters that we'll create from now on? Not always. If we reverse that shape, we'll create a sense of strength and power in our character! Notice the examples below.
cartoonbodies-12
cartoonbodies-121
Fragile man: pear body. Strong man: reversed pear body. Easy, right?
cartoonbodies-13
Can you tell the difference in pear shapes in this drawing?
Another interesting analogy would be to base the characters in objects that resemble a specific physical type, like the example below:
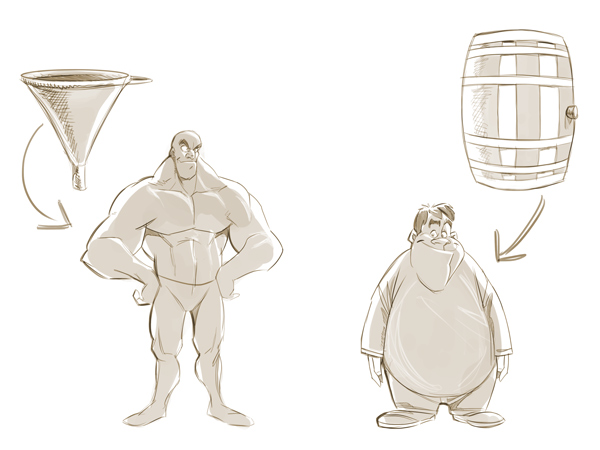
cartoonbodies-14
Basically we use the same pear principle. We're just applying a different study based on the same technique. You, as an artist, are free to use the method that suits you best!
The "goofy character" is one who walks on two legs (even the animals) and looks silly, clumsy and, generally, lazy.
This kind of character is often represented as a coward. They are generally more interested in staying out of trouble than anything else. It can also be represented as a nerd or as a frustrated guy.
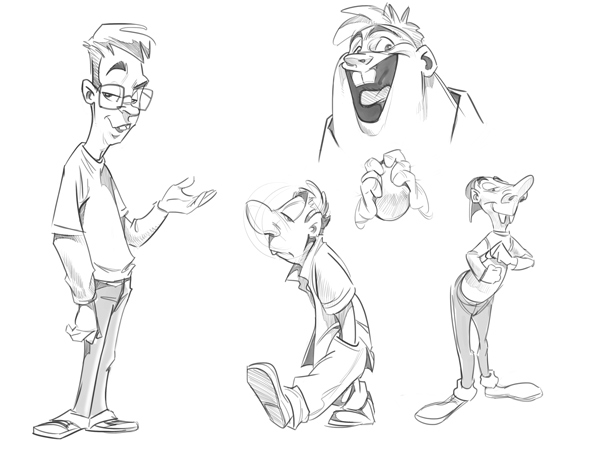
cartoonbodies-15
There is a template to be followed in such cartoon characters - although not a definitive rule, and may be changed to suit the nature of each character:
  • Thinner heads;
  • Big noses (or snout, if an animal);
  • Big teeth;
  • Small shoulders;
  • Virtually no chin;
  • Rule of pear (never inverted, always upward!).
Basically, these are the main attributes needed to make the goofy guy. Play with it until you master the technique to apply in any character.
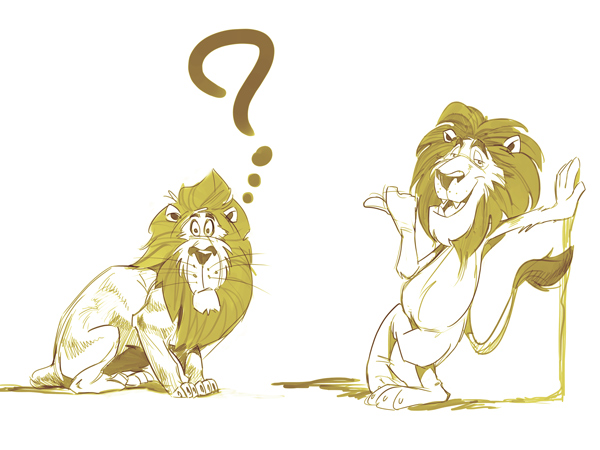
cartoonbodies-16
What? A lion on two legs? Wait... is this a goofy lion?
Not all animals that walk like humans are "goofy". Many of them have a sarcastic and ironic tone. As an example of these characters, we can mention Woody Woodpecker and Bugs Bunny.
We will now build together the body of a character based on the knowledge we have acquired. Let's get started!
I'll start drawing in a loose way. No need to worry about making several sketches until you reach the ideal proportion. This is part of the game!
We started building the head and body with rounded shapes:
cartoonbodies-17
Notice that we've defined the measures of our character with almost no effort.
cartoonbodies-18
Notice that we've already added the inverted pear rule here, since this is a strong character!
Along with the proportions, we added a few directional lines throughout the character to guide us in relation to his bodily gesture.
Let's add the lines that simulate the joints of skeleton. Notice that we're adding a common posture for cartoon hero - where the body weight is hanging on just one leg.
cartoonbodies-19
It's important to mark the hip area in the format of a basin, because it is easier to see the movement. This movement in the hips is essential to add dynamism in the posture.
Great! Finally, we will include the face details and the body muscle of our great hero.
cartoonbodies-20
Quit drooling... I'm only a sketch!
To build the muscles you'll need to have some basic knowledge of anatomy. Otherwise it will be difficult to add the right volume that the character needs.
Advertisement
Once you've defined the whole structure, we can add some clothing.
cartoonbodies-21
Perfect. Now our character is complete! By adding the costumes and ideal accessories, we achieved a great final result. Can we tell a story with only this picture?
Well, that's it! Here were presented the processes in draw bodies in a cartoon style. More than that, we also learned how the circular and oval shapes work together to form the body of the characters. We also learned the differences that make up the heroic/strong/bully type and the helpless/fragile type, and how to apply the technique of the pear to achieve these results. Finally, we discover how to apply the "goofy" technique, both in humans and in animals. To close with a golden key, we create a heroic character completely from scratch!
cartoonbodies-25
Are you already convinced that can create a complete cartoon character from head to feet? I'm looking forward to seeing them! Share your drawings with us below and, if you still have any questions, I'll be happy to answer it in the comments.
cartoonbodies-26_v2
Advertisement

Saturday, June 30, 2018

Blog Update #2

Hello, fellow Art Warriors!

I just wanted to address a few things in this blog update. First, thank you so much for supporting me and reading my blogs. I appreciate it very much. it means a lot to me that there were so many viewers on one of my blog posts (and most of them were from Poland!). I also appreciate your patience in waiting for another blog post, which leads me to my next point.

As most of you can already tell, I'm falling behind on my blog posts. I can explain that! I have already told my audience that I am attending Arlington Collegiate High of Tarrant County College at the Southeast Campus, so that also means that I'm attending summer school for required credit. This immediately means that I will be busy studying and working at home; therefore, I will also be behind on the weekends. As a result, this may hinder me from posting blogs on time.

My original plan was to post a blog on Saturday no later than 6:00 pm, but I knew the instant I started summer school I wouldn't have as much time to post as I did when I was free. Therefore, I would started posting my blogs in the middle of the week and add an apology. I hope to make amends with this update. I may not be able to stick to my Saturday schedule, so I will post in the middle of the week if I happen to post late or not at all.

That's all for now, thank you so much for you time and support! Thank you also for your patience! Again, I deeply apologize for my late or not at all posting. I will get better and try my best to be on time. I hope you have a wonderful day and looking forward to the 4th of July! I'll post you next time, my fellow art warriors and supporters. Have an awesome and artistic week!😉💖

Saturday, June 16, 2018

7 Drawing Tips for Beginners

Hello, Art Warriors! I want to again apologize for being late on my posts. As you probably already know, I'm going to an early collegiate high school and are continuing to do so; therefore, posts may be late in the future. I will do my very best to post my articles on time. In the meantime, Happy Reading fellow Art Warriors!


A child's first scribbling is something which it tries to express if you give a pencil in his hand.  Drawing is relatively very simple and an easy skill and is something with which you can have great fun. It is also relatively not a very expensive hobby and can start with paper and a pencil.  It can go on till acquiring costly pen and tablets - a computer hardware through which you can draw on your computer.  It is very costly; however, the precision for perfection is very high.

Unlike earlier days, getting information on drawing and sketching is very easy and inexpensive.  You can search for information on Google and get various sites which teach drawing.  Also, nowadays this art form is liked by many youngsters.  Like all other art forms, with constant and systematic practice one can become a great artist.

Listed below are few drawing tips which can help anyone improve their skill and become an artist. Reading and practicing these in your daily routine will improve your skill.

1. If you are drawing and you are a right-handed person, ensure that the light is from your left side. This will prevent your hand shadow falling on your paper.

2. The first step when you practice drawing - you should practice drawing line, straight line, curved line, scribbled lines, and your hand should obey the command of your thoughts and visions. You should control your hand and you should be able to bring out what you want.

3. You should further develop drawing circles, oval shapes, crossed lines and bold and thick lines.  Just like how a baby develops from crawling stage to walking stage, your art should also develop step by step.

4. These lines and curves are like pillars to a building. The foundation should be strong enough to have a good building; similarly, these initial small lines and curves will go a long way in your career. You should also start controlling the stress on your pencil. You should be able to bring the correct darkness and thickness in the lines what you draw.

5. Initially you will not be able to draw a circle or an oval shape correctly, nevertheless don't get discouraged. You should practice and practice until you get perfection.  You should also keep all your drawings carefully from the start to know how you are improving. You could also date your sketches and preserve it for the future.

6. You should concentrate in the area where you feel you are weak.  If you are not able to shade properly then learn more to do that.  You can try out your own style of shading.  Build your own individuality, never copy from another artist.  

7. Last but not the least, use good quality materials. 4B and 6B pencils and good chart paper or notebook with good quality paper should be sufficient to start with.  Quality definitely matters hence never compromise on quality.

Drawing is not easy at first, but as you progress you will get better. Mastering drawing takes time, energy/passion, and patience. It is a challenge, but it can be a fun one. Be sure to have fun with you art and not take it so seriously if it isn't necessary. Go get 'em fellow art warriors

Saturday, June 2, 2018

Drawing The Human Figure - Tips For Beginners

Hello everyone! I had an SAT today, but I will publish on time next time, promise! Here's the beginner article I promised. There is more to come in the future! In the meantime, Happy Reading!!! Enjoy.

Figure drawing is challenging. The act of rendering the human form accurately on paper can be intimidating and frustrating if you try to tackle everything all at once. It is for this reason that you should take things one step at a time and most importantly, practice! The following article will provide you with some of the basics for understanding how to approach your next figure drawing project.

The very first thing you will need obviously is your drawing supplies. Drawing does not have to be a very expensive art form. You can get started with a pencil and paper if you so desire, but there are certain supplies that will produce better results. It is quite difficult to recommend the perfect materials as every artist is different and therefore will have different preferences. Only time and experience will tell you what materials work best for your particular style. Your choice of materials will also depend on the chosen subject matter.

The best advice would be to get a variety of different pencils and papers and simply experiment. You will eventually come to like certain materials over others. Get your self a pad of newsprint paper. Newsprint paper is fairly inexpensive and excellent for practice drawings, although you should not expect these drawing to last very long. They will more than likely yellow over time. For your permanent drawings, a good quality paper is recommended. Strathmore is a good brand to look into. You may want to start with a medium textured paper as it has enough "tooth" to hold a fair amount of medium, but smooth enough to allow for detailed work. You will also need a good size drawing board that is smooth and flat for your drawing surface.

Before you even lift a pencil, you should have a basic understanding of human anatomy. When you study anatomy, you will learn more about the construction of the human body and its proportions. You will also have a basic understanding of the muscles and tendons and how they direct and control the body. There is no need to get carried away and memorize every muscle, bone, and tendon in the human body; just a fundamental understanding should suffice.

Getting the proportions correct in your figure drawing is one of the biggest challenges you will face as a beginner. It is for this reason that a unit of measurement was established using the models head. This is the distance from the top of the head to the bottom of the chin. 7 ½ to 8 heads is the standard measurement that has been developed for the height of an erect figure. This measurement can vary depending on the subject so you may have to make adjustments to your figure drawing. You should realize that the measurement of 7 ½ heads corresponds to the figure when it is standing erect. If the pose of your figure changes, adjustments will obviously have to be made.

Artists will often use a pencil to take the head measurement. Stand a reasonable distance from your subject. Grab your pencil from the bottom as if you were holding a hammer and extend your arm out fully in front of you toward the subject. Try and keep your head as still as possible. Make certain that you are standing in the same spot each time you take measurements. Now close one eye match the tip of the pencil with the top of the subjects head. Place your thumb on the pencil and slide it down until it matches with the bottom of the subjects chin. You now have taken the "head" measurement of your subject, which will now serve as a reference for measuring the rest of your subject.

When deciding on the type of pose for your figure drawing make sure you choose one that looks natural. Your model will be holding his or her pose for a long period of time and should be comfortable and relaxed. Give your model adequate time to move around and get settled. The more relaxed and natural the pose, the more believable the final drawing or painting will be. If your model looks uncomfortable or awkward, your painting or drawing will reflect that as well.

There are a number of different lighting situations that you can create for your figure drawing or painting. Will you be working indoors or outdoors? If indoors, will you be working in a room that has natural sunlight or will you be using artificial light? What direction will the light source come from? Will there be multiple light sources? If you are a beginner, you may want to create a lighting effect that strikes your model from only one direction and illuminates your figure only partially, thereby creating more shadow. This will make for a much easier figure drawing. As you gain more experience, you can then move on to more complex lighting effects.

When you begin your drawing, you should not be overly concerned with getting every detail correct in your figure or other objects that make up your drawing. Many beginners fall into this trap and ultimately wind up with a drawing that is out of proportion or that just looks wrong. Study your subject, squint your eyes and try to locate the basic shapes that make up your subject.

Figure drawing and painting is a vast subject and this article only touches on some of the basics. You should definitely take classes or workshops and practice your figure drawing with live models. Purchase a few good books on figure drawing and anatomy. Join discussion groups and ask questions. Most importantly though, keep practicing and never give up.

Saturday, May 26, 2018

Add Extra Value To Your Art Work - Part One

Hello everyone! I just want to say again thank you for your patience and for viewing my blog! I greatly appreciate it! I hope you enjoy this blog and other blogs coming in the near future. Happy Reading!!!!!


There are several things that you might not have thought of, that add extra value to your artwork and can make it worth more money when you come to sell it. I'm not talking here about reworking pieces you feel haven't come up to scratch. Yes, it is sometimes possible to rescue a less than perfect watercolor by using a pen and ink technique, and you can paint right over parts of an oil or acrylic painting to in effect completely rework the area, but here I am talking about techniques that don't involve changing your artwork in any way.

Sometimes you only need to put a cardboard mount around a painting to bring it out of the doldrums, and there is no doubt that the right mount and frame can do wonders for a slightly mediocre piece of art. For a sculpture, or a piece of ceramics, the right stand and appropriate lighting can make a big difference to the way it displays, but after you've made sure that your artwork is being displayed to its best what else can you do to add to its worth?

The first and most important thing you should do is make sure that your artwork is signed legibly. It's surprising how many people forget to sign their art, but it makes a big difference to the buyer. A signed piece of work is worth more money than an unsigned one, and it doesn't matter whether you sign it on the front, at the top or bottom, within the composition, or even on the back, just as long as you sign it. If you have an illegible signature spare a thought for future generations trying to make out what it says and wondering whether they have a piece by a famous artist. The first thing almost everybody wants to know about any piece of artwork is who made it, what's the name of the artist. If it's unsigned it's almost as though you didn't rate it enough to put your name to it, and if you don't rate it no one else will either.

The second thing you need to do, in order to add value to your art, is to give it a title. Now, some people don't like titling their work because they feel that it pigeonholes it and in some way restricts the viewer to seeing it within a particular set of conceptual boundaries, so if you are one of these people then you should really consider calling it 'Untitled'. Even with the title that says 'Untitled', a piece of work is worth more money than if it doesn't have a title at all. Artwork without a title leaves the potential buyer wondering whether perhaps it had a title once that has been lost, it leaves the buyer with an unanswered question and means they are less likely to buy it and more likely to move on to another piece instead.

Along with the title, your artwork would benefit from a short explanation about it. The more a buyer knows about a piece of work the more likely they are to buy it. If you think about it by putting yourself in the buyer's shoes for a moment, if you're faced with two pieces of work which are similar and you like them both, but you know nothing about one and quite a lot about the other, which one would you buy? Of course you would be much more likely to buy a piece of artwork that had information about it, because you'd feel more involved with it, you'd understand something about its history and about the person that created it, so it has more meaning for you and you feel a connection with it right from the start.

The short explanation or description about your piece of art can say whatever you want it to, there are no rules, but it's useful to tell people either what it's about or what it means to you. One thing you don't want to do is tell people what it should mean to them, the viewer or buyer of your artwork wants to be able to decide for themselves what the piece means to them, and it doesn't matter if it's something entirely different from what it means to you.

Most people buying artwork do like to know what it was you meant as you created it, or what drove you to create the piece the way it is. This can mean telling them something about you, your thought processes as you were beginning and working through the piece, or maybe what was going on in your life at the time you were creating this piece of art. You might decide to tell them about something you'd seen or heard that affected you in a particular way and that prompted you to express something specific with this particular medium. You might be telling them that this particular piece of art is one of a collection from your 'blue period', or your 'impressionistic landscape period', or whatever.

If you don't really want to give this information away, then perhaps instead you could describe the medium you have used, the particular techniques you've employed in using this medium and even the length of time it took you to create the piece. Really any information you give about the piece is better than no information at all, and it doesn't matter whether the potential buyer understands your concept or not, it still makes it more attractive to them to know that there was an intention of one sort or another behind the original idea.

Saturday, May 19, 2018

Why Art And Science Are More Closely Related Than You Think

Hey everyone! Thanks for taking time out of your day to read my articles. I greatly appreciate it! in the future, I will be publishing step-by-step articles for the basics, advanced, special occasions, and  more! Enjoy the article and have a fabulous day (summer for some)

Happy Reading!!!!!


Quora , CONTRIBUTOR

Opinions expressed by Forbes Contributors are their own.

(Image: Creative Commons)

Has an art ever become a science? originally appeared on Quora - the knowledge sharing network where compelling questions are answered by people with unique insights.

Answer by Dave Featherstone, Professor of Biology and Neuroscience, on Quora:

Science = art. They are the same thing.

Both science and art are human attempts to understand and describe the world around us. The subjects and methods have different traditions, and the intended audiences are different, but I think the motivations and goals are fundamentally the same.


I think one of the most primitive innate needs of humans is to understand the world around us, and then share that understanding.

We need to understand because we are terrified by things that are unpredictable, that don't make sense. I don't care how crazy you say you are, how much you think you like adventure. Unpredictability and senselessness are stressful. They drive people to suicide. It happens in war. It happens as a result of neurological diseases like schizophrenia. Scary movies are all about unpredictability and things that just cannot be real. We crave order. We crave predictability.

We share because we are social creatures. The success and failure of others is meaningful. We are bound up in this world together. All in the same boat, so to speak. Thus, when we have information, we like to share it. Even if it's trivial. Who doesn't gossip? Who doesn't like to be the bearer of news? Who doesn't like to show off some new insight? Everyone loves to talk about themselves, share their viewpoint, make their opinion heard. Quora and Facebook and telephones and books and movies are all about sharing our points of view and seeing the world through another's eyes and experiences.

At this point, I could make up some evolutionary 'just so story' about how sharing our perceptions with others made us successful as a species. And you would like it, because it would make sense. And you would like it because I shared it. And we would all feel good about it, even though it's complete nonsense that I just pulled out of my ass.

So ... does that make it science or art?

It doesn't matter. Both artists and scientists strive to see the world in new ways, and to communicate that vision. **

When they are successful, the rest of us suddenly 'see' the world differently. Our 'truth' is fundamentally changed.

Both scientists and artists with nothing new to reveal are failures. Scientists and artists who cannot communicate their insights are failures. It takes both skills to make a successful scientist or artist. Scientists who can communicate but have nothing new to say are frauds and hype-sters. Artists with new views of the world but who cannot communicate them effectively are crackpot fringies.

Scientists tend to struggle more gaining the new insights. Artists tend to struggle more with the communication. Both often work hard to gain the background and skills that will help them be successful. That's why there are prestigious schools of science and art.

Scientists do experiments over and over and over, trying to pin down some new aspect of reality. Once they have their new understanding, there are pre-arranged traditional modes of communication that make that part easier.

Artists often start with the new vision, then work through 'periods' in which they explore how best to get the message across. They have shows. They seek feedback to help them understand what works.

Artists and scientists often need to invent new concepts and technologies to accomplish their goals.

Both science and art have useful spin-offs. Applied science is technology. Applied art is decoration. Technology and decoration are applications of science and art for practical purposes. Technology and decoration make life easier. But they don't change how we fundamentally perceive what is around us. Science and art do.

Art = science.

** I used visual art analogies, but I think this is true for any art medium, including music, written word, spoke word, dance, mathematics, and cooking.

This question originally appeared on Quora - the knowledge sharing network where compelling questions are answered by people with unique insights. You can follow Quora on Twitter, Facebook, and Google+. More questions:​

Science: Is there a "right side up" in space?
Fine Art: What are some of the greatest wildlife photos?
Life: What is the best habit you've taken up from another person?

Wednesday, May 9, 2018

Abstract Art And The Spirit 1

Hey there fellow artists! Thanks for visiting my blog and you are welcome anytime.

It has been a long and raging argument that the abstract expressionists of the 50's, 60's and 70's were very busy contemplating their own navels and trying to find the "zen" in everything they did. 

I would argue that they were in fact just one very important example of the hungry sleep-drugged soul seeking a way to be heard. However, many artists of those times, and indeed today, would flatly deny anything remotely to do with spiritual things - or worse still - religious things.

Take, for instance, one of my favorites - Mark Rothko. This tragic artist committed himself to the task of producing massive canvases with many vaguely resembling the outline of a window - especially an after image once the eye has closed. His vast expanses of color seemed to hunt out a corner or edge in a desperate attempt to complete or conclude, the picture. Not satisfied with that he went on to give up titling his work saying that he did not want to influence the onlooker in any way. Ironically he failed ... and sadly took his own life. For me, his works speak of wonderful tantalizing clues visually demonstrating the struggling spirit seeking (and succeeding!) in revealing herself - now that is real influence! Let me explain by an apparently unrelated route:

I seek to assist my own spirit in attempting to make manifest even the tiniest, most pathetic, weakest fact that the spirit in us all is not only just trying to communicate with us - but is in fact actively seeking to set the whole human balance right ... which is the spirit leading the mind and body back to her source - not the other way round - the mind and body leading the blinded soul to ... well, eventually death.

Not so long ago I came across the writings of Meister Eckhart, a fourteenth-century Christian mystic. His words amazed me. He described in his many sermons what he believed to be the truth as to why we are here. He also revealed many tantalizing "images" of the spirit from the least angelic being right up to God Himself. His descriptions were ... how can I put it simply? ... abstract!

In one of his sermons, he described God as ... "unknowable" ... "not able to be understood" ... "undefinable". In another, he made a statement (one of many which may have contributed to him being accused of heresy!) "People say God exists ... God does not exist ... " left out of context that would be a truly blasphemous assertion. But he went on to say that "... God is far greater ... God is beyond existence". These and many other controversial sayings have impressed me so much that I have come to "see" God as an abstract entity - not, I hasten to add, an anarchic abstract form - but rather a God far more powerful, far greater - than I can imagine ... in other words totally undefinable. Rather than this putting a distance between me and God, it has done exactly the opposite. And when Eckhart began to describe the life of Christ in an almost completely abstract way - Eckhart said that Christ's life was the greatest example of the seeking and finding the uncreated source of the pure soul - my imagination began to run like a film of frenzied obscure visuals. Eckhart has become, to me, the patron saint of abstract artists.

The beauty of Eckhart's enigmatic words is intensely inspiring. What better way to illustrate his poetic writings than to describe Gods "isness" in the very basic form of a gigantic flat area of one saturated color untainted by anything else. Strangely enough, this could be part of an exact description from one of Rothko's immense, sometimes almost monochromatic, paintings.

But this is by no means the whole story ... one of Eckhart's contradictions said that on the one hand, God is totally unapproachable, yet at the same time, God is actually very, very approachable ...

However, that is another article...

Be sure to tune in next week because I will be sharing advice for 
the art lover's who are just beginning their journey in this wonderful and exciting world of art.

Hope to see you soon and thanks again for stopping by!

Motivational Christmas Memory

Hello, fellow Art Warriors!      I want to write this blog not to talk to you as a blogger, but as a creative friend. Some of you are teen...